
■ CHARACTERISTICS
1. Analogue time display: Hour, minute and
second hands.
2. Digital time display: Hour, minute and
seconds.
3. Calendar display: Month, date and day
of the week.
• Automatic calendar: Calendar adjusts
automatically for odd and even months
except February of leap years.
4. Time indication: Changeover between 12-
and 24-hour indications is possible.
5. Alarm: The alarm rings at the designated
time for 20 seconds.
6. Hourly time signal: Can be set to ring every
hour on the hour with a single “beep”.
7. Stopwatch: Measures up to 59 minutes and
59 seconds 99 in 1/100 second increments.
• Split time measurement
8. Illuminating light: The light illuminates the
display for easy viewing in the dark.
4. Press button “A” to set the flashing digits.
One digit is advanced with each press of
button “A”. The flashing digits except the
seconds and 12-/24-hour indication move
quickly by keeping button “A” pressed.
5. After all the adjustments are completed,
press button “B” to return to the TIME mode.
• Seconds setting
Press button “A” in accordance with a time
signal. The seconds are reset to “00” and
start immediately.
When the seconds count any number from
“30” to “59” and button “A” is pressed, one
minute is added and the seconds are
immediately reset to “00”.
Notes:
1. When setting the hour digits, check that
AM/PM is properly set. Only “PM” mark is
displayed. For the AM setting, there is no
indication.
2. When the time function is displayed in the
24-hour indication, the alarm will also be
displayed in the 24-hour indication.
3. If the watch is left untouched in the TIME
SETTING display with the digits flashing, it
will automatically return to the TIME mode
in 1 to 2 minutes.
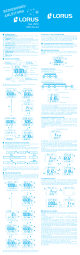
■ HOW TO SET THE ANALOGUE TIME
• Before setting the analogue time, be sure
to set the digital time.
(Refer to “HOW TO SET THE DIGITAL TIME”.)
1. Pull out the crown when the second hand
is at the 12 o’clock position. The second
hand will stop on the spot.
2. Turn the crown to set the hour and minute
hands to the desired time.
* When setting the minute hand, advance
it 4 to 5 minutes ahead of the time and
then turn it back to the exact minute.
3. Push the crown back in to the normal
position when the second digits count “00”
in the digital time display.
1. Press button “B” to show the ALARM mode.
2. Press button “C” to show the ALARM
SETTING display. The hour digits start
flashing.
3. Selection of the digits to be adjusted
(flashing) is made in the following order by
pressing button “C”.
Minutes
Hour ALARM mode
4. Press button “A” to set the flashing digits.
One digit is advanced with each press of
button “A”. The flashing digits move quickly
by keeping button “A” pressed.
5. After all the adjustments are completed,
press button “B” to return to the ALARM
mode.
1. Press button “B” to show the TIME mode.
2. Press button “C” for 2 to 3 seconds to show
the TIME SETTING display. The second digits
start flashing.
3. Selection of the digits to be adjusted
(flashing) is made in the following order by
pressing button “C”.
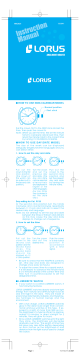
NREV071C
8-2011
CAL. V071 (RVR SERIES)
CAL. V072 (RBK SERIES)
Hour hand
Normal
position
Extended
position
Crown
Second hand
ALARM CHRONOGRAPH
PM
Minute hand
CALENDAR mode
ALARM mode
STOPWATCH mode
B
B
B
B
TIME mode
The selection of the mode is made in the
following order with each press of button “B”.
4. Press button “A” to set the flashing digits.
One digit is advanced with each press of
button “A”. They move quickly by keeping
button “A” pressed.
5. After all the adjustments are completed,
press button “B” to return to the CALENDAR
mode.
* If the watch is left untouched in the
CALENDAR SETTING display with the digits
flashing, it will automatically return to the
CALENDAR mode in 1 to 2 minutes.
Press for 2 to 3
seconds.
( )
Date
Month
Day
CALENDAR mode
P
M
■ HOW TO SET THE CALENDAR
A
Day of the week
C
B
Month
Date
1. Press button “B” to show the CALENDAR
mode.
2. Press button “C” for 2 to 3 seconds to show
the CALENDAR SETTING display. The date
digits start flashing.
3. Selection of the digits to be adjusted
(flashing) is made in the following order by
pressing button “C”.
■ HOW TO SET THE DIGITAL TIME
Hour
Minutes
Seconds
P
M
C
B
A
“PM” mark is displayed in the
12-hour indication.
“AM” mark is not displayed.
Seconds
( )
■ HOW TO SET THE ALARM
PM
C
B
A
Hour
Minutes
Alarm mark
“PM” mark is displayed in the
12-hour indication.
“AM” mark is not displayed.
Hourly time
signal mark
ALARM CHRONOGRAPH
P
M
Hour hand
Minute hand
Normal
position
Crown
Second
hand
Hour
Minutes
Seconds
“PM” mark is displayed in the
12-hour indication.
“AM” mark is not displayed.
Extended
position
C
B
A
■ DISPLAY AND CROWN / BUTTONS
Minutes
Hour
12- or 24-hour
indication
TIME mode
Press for 2 to 3
seconds.
P
M
PM
PM
PM


 England
  Deutschland
  France
  Italia
  Polska
  United Kingdom
  Россия
  Nederland
  España
  Magyarország
  Sverige
  România
  Portugal
  Colombia
  Suomi
Suomi  New Zealand
  Česká republika
  Türkiye
  Danmark
  日本
日本